There are times when you have to change the MAC address of your device. This is due to the fact that a lot of places may restrict devices based on the MAC address. If you are trying to overcome this scenario, you’ll have to change the MAC address in some way possible. In this article, we have tried to compile a few of the methods you can use for changing the MAC address of the Android device. The best part? We have added ways for both rooted and non-rooted Android devices. Let’s have some necessary introduction though.
What Is and How To Check MAC Address?
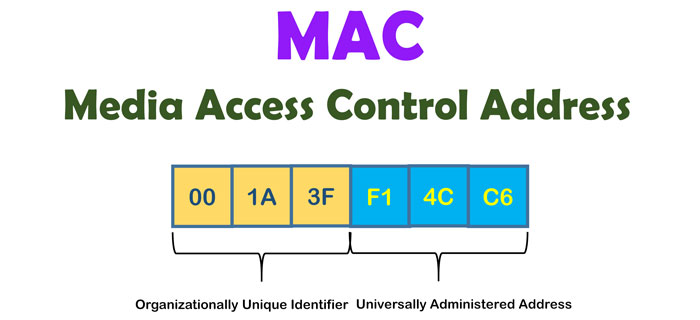
MAC address is one of the few things that are unique to a device. Every device that can be connected to the internet would have a MAC address that is used as an identifier. When connected to a LAN or Wi-Fi, this will be used for pointing out the specific device. The ID is of 12 characters and cannot be changed using normal methods. However, since there are instances when you have to, we have to find. In order to find the MAC address on Android, though, you can follow the steps shown below:
- Go to Settings of your Android device
- Select ‘About Device’
- Now, scroll down until you see the section named MAC address.
For precautionary purposes, we advise you to note down the original MAC address of the device. If you want to keep accessing private networks that were connected to earlier through MAC filtering, you may want to ensure that.
Also Read: How to find the MAC (Physical) Address in Windows 8.1 or 10
Now that you have a clear idea about things, shall we check out the methods to change the MAC address?
Method #1 Using Terminal Emulator, Available for Rooted
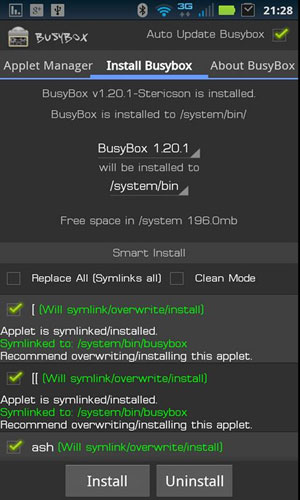 You should have a rooted Android device if you want to use this particular method for changing the address of the device. More importantly, you have to install two separate apps on your device — Terminal Emulator and Busybox. Once these are done, you can follow the steps we’ve shown below.
- You have to launch the Terminal Emulator application on the Android device.
- In the Terminal window, you have to enter the following command. Press Enter after that.
SU
- Now, the app would prompt you to ensure root access and you have to approve this if you would like to proceed.
- Soon enough, you will be able to see the original MAC address of the device. In order to change the same, you have to enter the following command.
busybox ifconfig eth0 how ether XX:XX:XX:XX:XX:XX
- Make sure that you enter the new MAC address of the device in place of XX:XX:XX:XX:XX:XX. As we’d said, there will be 12 characters in total.
- Once you are done with that, enter the following command,
busybox iplink show eth0
Well, that’s it. You have successfully changed the MAC address of your Android phone with rooting. If you’d like to do it without rooting, read along.
Method #2 Using Settings without Rooting
So, this method allows you to change the MAC address of your Android phone without having to root the device. Here, too, however, we need the help of a third-party app called Android Emulator. Of course, we do understand the confusion and it’s clear that the app works without root as well. This time, however, the commands are different.
- You have to open the terminal app and write the following command before pressing Enter.
IP link show
- Now, you will be shown a variety of data on the screen and you have to find the one structure that is matching the structure of a MAC address. To do this, you can go to Settings again and check how your MAC address looks.
- In this step, you have to click on the interface, and enter the following commands
ip link set AAAA address XX:XX:XX:YY:YY:YY
ip link set AAAA broadcast XX:XX:XX:YY:YY:YY
- Once again, you have to convert the XX:XX:XX:YY:YY:YY to the MAC address that you want to give to the device. Make sure that you are changing the MAC address by altering the three pairs in the last portion and not the first.
If you change the first three pairs, there could be some problems. So, it’s always good to deal with the latter set of pairs.
So, this is the easiest and most convenient way to change the MAC address of the device. We hope many do love this more than the first one.
Method #3 Using BusyBox (Requires Root)
You would be familiar with the BusyBox app, which we had recommended installing in the first step. In here, we are using another app that has a quick way to alter the MAC address of the Android device. The app is called ChameleMAC and you can find somewhere on the web.
- You have to open the ChamaeleMAC app and do the necessary start-up process.
- Of course, the app would then ask you for root access and make sure you provide it.
- Unlike the other methods, there are fewer commands and codes included in the process. You will be able to press one of the two buttons to proceed.
- First, you can create a random MAC address, which is enough for most people. The second method is to enter a specific MAC, but the app makes this process easier as well.
- Once you are done, ChameleMAC would ask for confirmation and you are good to go.
Pretty simple, huh?
The Bottom Line
These three are the trusted options when you want to change the MAC address of your Android. Since we’ve included both root and non-root methods, we think the article would help a lot of people. Do you know any other methods? Do let us know via comments.

How about making a video and showing how to do these tricks….. We came here to learn and this blog doesn’t really show perfectly how to do and these are written so we didn’t really get all…. Then make a video and share with us …..
The #2 trick without rooting the device is not working nowadays. It used to work back in the days.
Thanks for these tricks. I had a rooted device so had no issue with the Busybox method. Thanks a lot.
Do we have to add our own MAC address in the first method? Please guide.
Thanks. Changed my MAC Address successfully with these tips. My neighbour blocked my IP address from his WIFI network. Regained access 😉
You are welcome.
Isn’t changing MAC Address for manipulation or regaining access to some places WiFI networks is illegal? Please enlighten me about this.
Yes it can be illegal some places. Please follow guidelines of the respective places.
Thanks for this useful guide. Following the non-rooted method.
You are welcome.
Will it be conflicting if we use someone else’s MAC address? Like changed to someone else’s MAC address to get access to something?
Hello Tushar,
I mistakenly typed Wrong command in Terminal Emulator and now the phone is not connecting to the internet. Not even WiFi network.
Retrying with the correct command is not helping me. Please guide me.
Thanks for this guide.
Hello Tushar, Thanks for sharing this tutorial. Using a Rooted OnePlus 7T and wanted to change MAC Address. The first method worked flawlessly..
Thanks.
You are welcome.
Why change the MAC ID for any particular reason.?
Many places restrict internet access based on MAC. to Overcome this situation we can change our device’s MAC.
busybox method sounds simple. I will give a try on this.
Yes, but that requires root.
My college restricts wifi based on MAC. While searching I land on this page. Thanks, I have to give it a try on this.
Sure, Brian. Feel free to ask here if you got any issue while doing that.
Is this even legal?
Hi Kathryan
Yes changing your own device MAC ID is legal. But doing something wrong with this trick can be not that legal.
This is only until reboot.
Then mac addr is back to default
Hi how to change mac address of huawei pocket wifi
How to restore the mac address of my android based mifi router wipod which seems to have gotten corrupt i see 40 40 40 40 40 40 instead of its original..any ideas or inputs are very appreciated..