macOS is popular for its impressive features all the time. However, a fly in the ointment is that macOS comes with read-only support for Windows NTFS file system and its disabled-by-default write support for NTFS is unstable. This inconveniences many users who need to use NTFS drives on Mac to modify files and transfer files between Macs and Windows PC. That is the reason why NTFS drivers for Mac have become a necessity for people who often need to access NTFS drives through a Mac. In this article, we would like to introduce an easy-to-use NTFS for Mac program we’ve found – iBoysoft NTFS for Mac. First, let’s have a quick overview of iBoysoft NTFS for Mac and how it helps us make NTFS read-write support on Mac easier than ever.
About iBoysoft NTFS for Mac
iBoysoft NTFS for Mac is an NTFS for Mac app, which enables users to mount NTFS drives on Mac in read-write mode. That’s to say, we’ll be able to write to, edit, delete, copy, and paste the files stored on NTFS drives as it is naturally supported by macOS. If we have this useful tool installed on our Mac and then plug an NTFS drive into this Mac, the NTFS disk will not be read-only anymore. If photos and videos are locked and the documents are write-protected on Mac because of NTFS file system, iBoysoft NTFS for Mac would be helpful to fix such read-only issue.
Moreover, iBoysoft NTFS for Mac makes ‘Erase to NTFS’ possible on Mac. As we know, we cannot erase a disk to NTFS file system when we want to format a drive in Disk Utility. But in some cases, some of us prefer certain adorable features of NTFS file system. For example, if we want to take advantage of the encryption and decryption features of NTFS, or if the disk is larger than 32 GB, NTFS would be a better option than exFAT and FAT32.
Generally speaking, iBoysoft NTFS for Mac could be one of the best software to manage NTFS drives on Mac, including external hard drives, USB flash drives, SD cards, memory cards, Pen drives, and some other NTFS formatted storage media. Up to now, we can have an overview of this app, so we would love to go details about some key features of this software and how these functions help us use NTFS drives on Mac.
How to use iBoysoft NTFS for Mac to write to NTFS drives on Mac?
iBoysoft NTFS for Mac offers the easiest way we have ever met to mount NTFS drives in read-write mode on Mac computers. Even some inexperienced users would be able to handle this. Assuming that you have an NTFS formatted USB drive and now you need to edit the files on this drive, you can follow these steps to write to your NTFS disk.
Step 1: Once you have downloaded and installed this software on our Mac, you can go ahead to launch and set it up.
Step 2: You need to plug your NTFS formatted USB flash drive into your Mac and wait for it being recognized by the computer. Usually, it will only take a few seconds.
Step 3: After this disk is recognized and mounted by iBoysoft NTFS for Mac, you will see your drive in the menu bar of this app that is showing up at the upper right menu of your desktop. And then, you will be able to write to, edit, delete, or make some other changes to files on this drive seamlessly.
Easy, right?
How to manage NTFS volumes on Mac with iBoysoft NTFS for Mac?
All right, another feature we love about this software is that we can use it to manage our NTFS drive as it is naturally supported by macOS. How? Still, we need to connect the NTFS disk to the Mac and mount it. After it is mounted, simply click on ‘Disk Management’, select the volume you want to manage, and then choose one of the four operations from the menu bar.
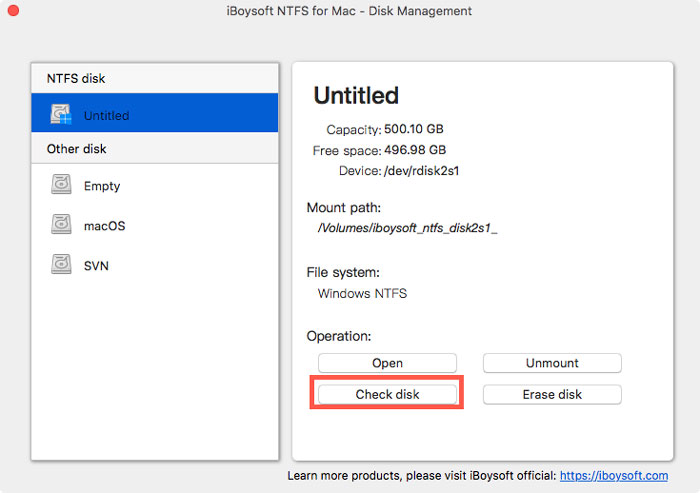
Open: This button is used to open the volume you select. Once you click it, the file list of this volume will pop up and is prepared for edition and view.
Unmount: Use this option when you finished your work on your disk. A safe unmount before you eject your disk and plug it out would greatly decrease the possibility of disk corruption.
Check disk: Click this button when your disk is corrupted, unreadable, and unmountable on your Mac. It is a quick way to check and repair some minor disk errors.
Erase disk: If you can’t repair some serious disk errors like file system corruption by Check disk feature, reformatting would be a feasible solution to fix such problems. But use this feature carefully as it will wipe all your files on this drive. Make a backup before you use this feature, in case you will make efforts to recover files from formatted drives later.
Conclusion
To sum up, iBoysoft NTFS for Mac is a nice software to use and manage NTFS drives on Mac. Except for its useful features, what we like is that it supports a wide range of Mac operating system, from macOS 10.15 Catalina to Mac OS X 10.8 Mountain Lion. Moreover, it provides 3 times free trial, which is friendly for people who would love a try before they finally pay for it.
Now, it’s your turn to check it out, especially if you are looking for some NTFS for Mac software to bridge the gap between Windows and Mac.